Showing posts with label Dessert - Brownie/Bar. Show all posts

Oreo-Stuffed Blondies

>> Thursday, April 21, 2011

A few weeks ago, a guest post at She's Becoming Doughmesstic featured oreo-stuffed blondies. Then I saw a post for other cookie-stuffed cookies. The idea is so crazy, I just had to try it. I was having a craving attack for chocolate chip cookies and since I had a package of Oreos, I decided to give these blondies a try.


Because it made an 8x8 pan, I kept the ingredient amounts the same. However, when it came to putting the Oreos into the dough, I felt that there wasn't going to be enough dough for the top layer, so instead of 12 cookies, I used 9. Then because I had trouble spreading the top layer, I just made sure the cookies were covered. Hopefully the dough would spread and rise?


To my relief, the Oreos were covered after baking. Because I used only 9 cookies and didn't want to split the cookies while cutting, I cut them into 9 huge squares. It was SO hard not to eat the whole pan! That warm, chocolatey gooeyness from the chocolate chips and the softness of the Oreo. Mmm I'm tempted to bake some right now as I type this post.


I wasn't a fan after they were completely cooled to room temperature. Don't get me wrong - I'd still eat them, but they lost that wonderful gooeyness. Plus the Oreo became a crunchy cookie again rather than melting into the dough (and in your mouth). If you want that little bit of an Oreo crunch rather than everything meshed together, then you'd like them once completely cooled.

Oreo-Stuffed Blondies

1/2 cup butter, softened
1/2 cup sugar
3/4 cup brown sugar
1 egg
1 tsp vanilla extract
1/2 tsp salt
1 tsp baking powder
1 1/2 cups flour
1 cup semi-sweet chocolate chips
12 Oreos

Preheat oven to 350 degrees. Line an 8x8 pan with foil and spray with cooking spray.

Cream the butter and sugars together until light and fluffy. Add in the egg and vanilla and mix until combined. Mix in the flour, salt, and baking powder until all the flour is incorporated into the dough. Fold in the chocolate chips.

Press half of the dough into the bottom of the prepared pan. Lay the cookies on the the dough and press down. Press the remaining dough on top of the cookies. The whole top may not be covered. Just make each cookie is encased in dough.

Bake for 25-30 minutes or until golden and a toothpick comes out clean. Cool 15 minutes before cutting.

Source: She's Becoming Doughmesstic

Read more...

I Heart You Giveaway

>> Sunday, February 13, 2011

McCormick has done it again! Last year, they asked me to be a part of their Red Letter Day. This year, they asked if I wanted to be a part of their "So Many Delicious Ways To Say I Heart You" Day. Of course I said yes because I had fun doing it last year. Too bad Murray isn't around to sit in the box.


Although he was around for the Super Bowl

After a long day of work, I came home to find this lovely red box on the back porch. I'm just glad FedEx found the house with my directions. If I don't tell them where, usually it ends up at the neighbor's. Last year they focused on crafts and baking. This year, their theme is I Heart You and made a Relationship Matrix where you pick a person and a relationship status, and that gives you a recipe to make.


Last year, I made red velvet cupcakes. This year I still wanted to make red velvet but in a different form. My two final picks were red velvet brownies or red velvet bonbons. Since the bonbons would take extra time to make, roll, chill, dip, etc. I opted for the brownies. Plus my relationship matrix chart says to give these to coworkers, and that's what I was planning on doing since that's a lot of brownies for one girl.


However, I was torn. Of course I wanted to use McCormick's brownie recipe, but I did see some red velvet cheesecake brownies pop up in the blog world. My idea was to put both recipes together - use McCormick's brownies for the base with Baking Bites cheesecake layer. I even used sprinkles on top.


They turned out to be cakey, which is understandable since it is based on red velvet cake. With that said, I thought they were a tad bit dry on their own BUT were perfect with a cup of coffee or tea.


Huge thank you goes out to McCormick for being an awesome company! They are so awesome, they want to give YOU, one lucky reader, your own I Heart You box!! The giveaway will remain open until Monday February 21 at midnight EST. You can earn up to five chances.

1. Leave one comment telling me your favorite romantic dessert.
2. Tweet this giveaway using @chocolatemoosey. Then leave a comment here with your twitter name.
3. Tell your friends on Facebook, then leave a comment, telling me you did so.
4. Post about this giveaway on your blog. Make sure you leave a comment with your link.
5. "Like" my Facebook fan page, then leave a comment with your name.

Remember, for each step you complete, you must leave a separate comment. If you have to post four times in a row, that is fine. Each comment will be one entry, so you would lose entries if you posted it all in one.

One last detail - you must be a resident of the United States.

Read more...

Chocolate Chip Cookie Dough Cheesecake Bars

>> Tuesday, August 17, 2010

Now that I live alone, I don't bake as often. Sure, I could take stuff into work (and I have), but it seems like everyone is on Weight Watchers. Plus I don't always have the energy. How do all you parents do it? I barely have energy to cook and clean for myself, let alone a family. I guess you get used to it? I hope so, or I'll never be able to take care of one.


My family does come up to visit, so when they do, I want to have a special treat for them. That way I can bake and get rid of the extra calories. Several months ago, I found a used copy of The Essential Chocolate Chip Cookbook. I've had this on my Amazon Wish List ever since I saw these on Bake or Break. It's more than just chocolate chip cookies. It has cookies, muffins, pies, tarts, puddings, cakes, ice cream desserts, pretty much anything with chocolate chips, including the Strawberry and White Chocolate Cheesecake I made back in June.


Anyway, after drooling at the pictures, I decided to make Chocolate Chip Cookie Dough Cheesecake Bars. What a mouthful! And a good one too. The cookie dough layer on top ending up being almost a whole layer rather than chunks here and there, so the cheesecake layer isn't as dominant. I opted to leave off the chocolate drizzle. I enjoy them cold, preferably from the freezer. Of course my family forgot to take the extras home, so that's why they ended up in my freezer in the first place.

Chocolate Chip Cookie Dough Cheesecake Bars


Crust
1 1/2 cups graham cracker crumbs
5 Tbsp butter, melted
2/3 cup mini semisweet chocolate chips

Dough
5 Tbsp butter, at room temperature
1/3 cup brown sugar
3 Tbsp sugar
1/8 tsp salt
1 tsp vanilla extract
3/4 cup flour
1 cup semisweet chocolate chips

Filling
10 oz cream cheese, room temperature
1/4 cup sugar
1 egg
1 tsp vanilla extract

1/3 cup semisweet chocolate chips

1. Crust: Preheat oven to 325F. Line 9-inch square pan with foil and spray with cooking spray. In medium bowl, stir crumbs and butter together until crumbs are evenly moistened. Stir in mini chocolate chips. Press crumb mixture over bottom and 1 inch up the sides of pan. Bake for 6 minutes. Cool pan and leave the oven on.

2. Dough: In large bowl, beat butter, brown sugar, sugar, salt, and vanilla until smoothly blended, 1 minute. Add flour, mixing just to incorporate it. Stir in chocolate chips. Set aside.

3. Filling: In another bowl, beat cream cheese and sugar just until smooth. Mix in egg and vanilla, beating just to blend them in. Pour cheesecake batter into the crust. Drop teaspoonfuls of cookie dough over top of the batter. Bake until top feels dry and firm and looks set if given a gentle shake, about 30 minutes.

4. Optional drizzle: Melt 1/3 cup chocolate chips until melted and smooth, either in a microwave or heatproof bowl over boiling water. Use a teaspoon to gently drizzle thin lines of melted chocolate over the top of the bars. Cool about 1 hour. Cut bars into 16 pieces. The bars can be covered and stored in the refrigerator for up to 3 days. Serve cold or at room temperature.

Makes 16 bars.

Source: The Essential Chocolate Chip Cookbook, page 47-48

Read more...
Tuesdays With Dorie - White Chocolate Brownies

>> Wednesday, June 02, 2010


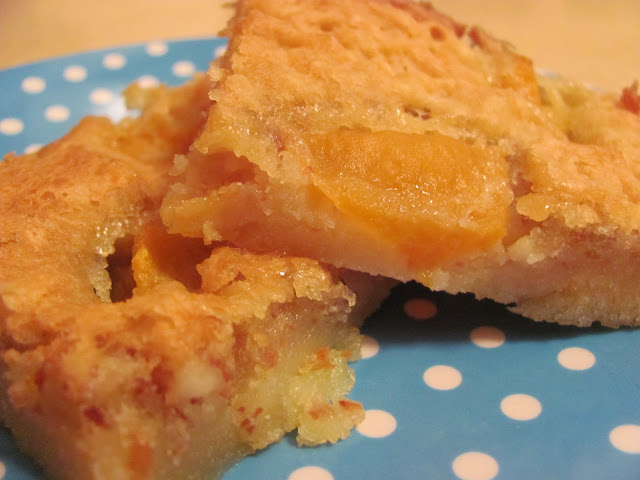
So I'm sitting at my kitchen table yesterday morning and decided "hey I should prob look up the latest TwD challenges, especially since today is Tuesday." I realized yesterday's challenge was white chocolate brownies and knew if I ran out to the store, I could make them in the evening. Plus I had some apricots I wanted to use, so I figured I would sub them for the raspberries. I did bake these last night, but due to some unfortunate news that caused me to stress out (rescheduling stuff with a tight schedule), I was too upset to take pictures and upload them. Hence why they are being posted Wednesday evening.


I tried doing the meringue, but the egg whites wouldn't even whip to soft peaks. I think it was because the house was too hot. I couldn't whip them the other day for a pie I made. Or maybe I just need to buy a bowl just for egg whites so it doesn't get used for food storage.

I cut this recipe in half bc I didn't want all these brownies in the house when I made cheesecake the other night. I don't know if they had enough white chocolate in them. Plus they are super thin. I did use lemon zest instead of orange bc it's what I had, and I hate oranges.

It's hard to say I liked this recipe. I don't think they turned out the way they were supposed to, so I'll have to hopefully try this again the right way. Thanks Marthe of Culinary Delights for hosting this week! You can find the recipe in Baking: From My Home To Yours on pgs. 110-111 or on Marthe's blog.

Read more...
Tuesdays With Dorie: Chocolate Oatmeal Almost-Candy Bars

>> Tuesday, January 19, 2010


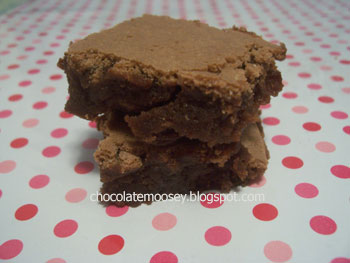
Phew I think my book was getting dusty after not being touched for a few months. I seriously was going to do last week's, but then I realized it was Wed. and I missed it haha So now I'm back with Dorie's Chocolate Oatmeal Almost-Candy Bars. I made these late last night, so I couldn't eat them until this morning. This is what I had for breakfast with my coffee.


It took me a long time to make this bc I had to shell the peanuts. Also, I didn't measure out the raisins, and I definitely didn't put enough. I love chocolate and raisins together, so I'll make sure to take care of that next time.


Thanks Lillian of Confectiona's Realm for choosing this week's recipe! You can find the recipe on p. 114-115 of Dorie's Baking: From My Home To Yours or on Lillian's blog.

Read more...

Rocky Road Brownies

>> Sunday, September 13, 2009

Here's a tip I learned over the years. Just because your cookbook says holiday cookies doesn't mean you can only make them for the holidays. In fact, nothing about the recipes makes them holiday only (except maybe pumpkin for fall cookies and the way cut-out cookies are decorated). Take these rocky road brownies for example. The book is called Grandma's Christmas Cookies, but give me one good reason why these should be made only for Christmas. In fact, I bet if I didn't tell you the title of the book, you never would have known. Personally, holiday cookbooks were invented so if I were making a cookie tray, having company, or invited to a cookie exchange (someone please invite me!), I don't have to look very far for an "elegant" recipe. By elegant I mean more than your traditional chocolate chip cookie.


Fact - I hate, hate, HATE the lighting in my kitchen. Another fact - I love marshmallows, which is why I picked these brownies. That and the picture in my book looked amazing. Plus I had peanuts leftover. The topping looked amazing, and I tried to capture that in a photo, but it was hard because the brownies are very gooey. It is best to eat these cold because of the topping, but they can also be eaten at room temperature (provided that it's not a hot summer's day).

Rocky Road Brownies


1/2 cup butter or margarine
2 squares (1 oz each) unsweetened chocolate
3/4 cup sugar
1/2 cup flour
2 eggs
1 tsp vanilla
1/4 cup salted peanuts, chopped

Topping
2 Tbsp butter or margarine
1 1/2 oz cream cheese
1/2 square (1/2 oz) unsweetened chocolate
2 Tbsp milk
1 1/4 + 2 Tbsp powdered sugar
1/2 tsp vanilla
1 cup mini marshmallows
1/2 cup salted peanuts

1. Preheat oven to 350F. Line 8x8 pan with greased foil.

2. In a saucepan, melt butter and chocolate, stirring constantly. Add sugar, flour, eggs, and vanilla; mix well. Stir in peanuts. Spread into baking pan. Bake 20-25 minutes or until brownie starts to pull away from sides of pan. Cool completely

3. Topping: In another saucepan, combine butter, cream cheese, chocolate, and milk. Heat until melted, stirring constantly. Remove from heat. Add sugar and vanilla. Beat with mixer until smooth. Stir in marshmallows and peanuts. Immediately spread over cooled brownies. Cool completely before cutting. Store in refrigerator.

Source: Grandma's Christmas Cookies 1997 p.62

Read more...

Tuesdays With Dorie - Espresso Cheesecake Brownies

>> Tuesday, September 01, 2009


I know my readers are prob wondering what has happened me to the past week or so. Well, I got a job. Now before you go congratulating me and whatnot, it's not what you think. It's just a part-time job at Target. Yes, I spent the past four years in college, and I'm at Target. People tell me to suck it up and be grateful because it is a form of income. Sorry but working at Target doesn't help my self-esteem when I know I can do better. I just hope I can get life straightened out before it gets worse bc frankly, I'm not happy with how things are going.

ANYWAY

On a slightly happier note, I made Dorie's Espesso Cheesecake Brownies aka crownies. Apparently Verizon doesn't recognize the word brownie when texting, but it does put crownie. I didn't even know that was a word or part of a word. Verizon also doesn't recognize salsa, jalapeno, fajita, or cupcake.


I really like my swirling. So pretty! I was skeptical on adding the sour cream layer, but some people said it added good contrast, so I did. Nope, not a fan. I ended up scraping off the sour cream when I ate a piece. The rest of the brownie is good, so next time I'll leave off the top layer. Also, I didn't have instant espreso powder. I was going to use instant coffee, but at the last minute thought, hey why don't I just make espresso? I'd be dissolving it in water anyway. If I would've thought about it earlier, I would've saved some when making my coffee.


Thanks to Melissa of Life In a Peanut Shell for picking these brownies! So good! You can find the recipe on her blog or pages 104-105 of Baking: From My Home To Yours.

Read more...

Tuesdays With Dorie - Brownie Buttons

>> Tuesday, August 11, 2009


Ever have a dream about food? Ironically, two days before making Dorie's Brownies Buttons, which was this week's pick, I had a dream about baking brownies. Or at least attempting. It was 2 AM and I was melting together chocolate and butter. Once I realized it was going to take 20 minutes to bake, I decided I wanted to go back to sleep and put the pot in the fridge, thinking oh it's just butter and chocolate. It'll be fine until tomorrow. Scary thing was this dream felt real. I was in my kitchen, at my stove, using my pot. I even made sure to check the kitchen for any evidence of brownie baking when I woke up haha

Here's the crazy part. I had a bar of baking chocolate in the cupboard, which I was going to use for these buttons. When I went for it, I couldn't find it. I brought everything out. WTF? Where's my chocolate?! I started thinking but could not come up with anything made recently that used my chocolate. Possible conclusions are my brother ate it, having no job really does affect my memory, or I used it to bake brownies in my dream. Considering that last one is just silly and my brother never goes in that cupboard, I'm left with my memory failing. I even looked through my camera pictures, but nothing sticks out.

I couldn't run to the store (or make anyone run to the store), so I melted semi-sweet chocolate chips. Don't know if I had enough because I don't have a kitchen scale. I kinda want to get one of those. Anyway, I filled 16 mini cups like Dorie said. Next time, I will probably make 12 because the buttons were so tiny and barely rose.

Did you know peanut butter chips do not melt very well? I was going to dip half in pb, half in semi-sweet chocolate. When I melted the pb chips, it just was not smooth. While they were hardening in the fridge, I got the brillant idea of sprinkles. Makes them much more fun.


Thanks to Jayma of Two Scientists Experimenting in the Kitchen for this week's pick. I hope she didn't have some crazy dream about baking these. You can find the recipe on pages 106-107 in Baking: From My Home To Yours or on Jayma's blog.

Read more...

Tuesdays With Dorie - Tribute To Katharine Hepburn Brownies

>> Tuesday, July 07, 2009


This week's TwD was chosen by non-member Lisa from Surviving Oz because she won the logo contest. I almost didn't make these because I was tired yesterday, but I haven't done a TwD in awhile. The nice thing about making brownies is you pretty much mix everything together in one pan then transfer and bake.

If you are friends with me on Face Book or read the P&Q section on the TwD site, you probably saw that I almost had a disaster. This is what I wrote:

How Not To Make Brownies: Put flour in small bowl. Make brownie batter. Put pan in oven. Lick spoon. See bowl of flour on counter. Frantically pull out hot pan without oven mitts. Burn finger. Attempt to stir in flour. Rip foil. Pour into bowl. Replace foil. Replace batter. Put back in oven. Reset timer. Continue to lick spoon.

Since there was only 1/4 cup flour, I put it in a cereal bowl rather than a mixing bowl. I guess I thought I added it with the sugar or something because I noticed after putting it in the oven that I forgot about it. Oops! Besides a few extra dishes, I recovered...


...or so I thought. Apparently when Dorie says use parchment paper, she really does mean parchment paper and not foil. Since I had to hurry up and put new foil in the pan, I guess I didn't spray as much as I should. I thought I did, but my brownies argue otherwise. I refrigerated them for about 30 minutes which helped with the gooey factor, but they still stuck to the foil.


Tastewise - don't let the instant coffee fool you. I will admit I am a coffee snob. If it's not freshly-grinded coffee, I don't want it. I can tell when you have Folger's or Maxwell House because it just has that taste, but what's worse than stale coffee is instant coffee. I don't completely hate it - it reminds me of my stays at hostels in the UK. Not all hostels had a pot of coffee for breakfast, so my friend Shannon packed instant coffee, tea bags, and sugar while we were traveling. However, I would never willingly make myself a cup of instant coffee. In fact, I can't really explain why I have instant coffee in the cupboard. I think it was a free sample pack or something. Anyway, fellow TwDers assured me the coffee is there to enhance the chocolate, and you can't tell that much. Dorie called for 2 tsp but I used one serving packet, so maybe 1 tsp? I could still taste it, but it brought out the chocolate rather than oh I taste coffee and chocolate. I also added the optional cinnamon, but I can only taste a hint of it.

To sum things up, I would definitely make these again, as long as they don't stick or I forget the flour again. Thanks to Lisa for picking this recipe! You can the recipe on pages 96-97 of Baking: From My Home To Yours or at Surviving Oz.

Read more...

Warning - I Gots Me Some Brownies

>> Saturday, July 04, 2009

...ok I lied. I don't have these brownies anymore because I made them last week to take over a friend's house. A group of us have been hanging out more and more lately, so I decided I wanted to bring some treats over so I'm not showing up at my friend's house empty-handed. I asked for requests, and one was caramel brownies. I don't have any caramel and saw I had two open jars of peanut butter, so I decided I was doing PB instead.


I decided to make Nestle Tollhouse's brownies from their cookbook. I already made these brownies before but without the PB swirled in. As you can imagine, these brownies didn't last very long, mainly because I ate most of them but shhhh. The measurements are slightly weird because I cut the recipe in half for an 8x8 pan.

Chocolate Peanut Butter Fudge Brownies

1/2 cup + 1/3 cup sugar
1/4 cup (1/2 stick) butter or margarine
1 Tbsp water
2 oz. unsweetened baking chocolate OR 6 Tbsp cocoa + 2 Tbsp oil
1 egg
1 tsp vanilla
2/3 cup flour
1/8 tsp baking soda
1/8 tsp salt
1/4 cup peanut butter
1 Tbsp + 1 1/2 tsp sugar
1 Tbsp milk

1. Preheat oven to 350F. Grease 8x8 pan or line with foil.

2. In a saucepan, melt sugar, butter, and water. Add chocolate and stir until combined. Beat in egg and vanilla. Gradually add flour, baking soda, and salt. Do nout pour into pan just yet.

3. In a microwavable bowl, combine peanut butter, sugar, and milk for 45 seconds or until smooth. Pour brownie batter into pan. Spoon PB mixture on top; swirl in with a knife.

4. Bake 20-25 minutes. Toothpick should have a few crumbs on it. Cool completely in pan before cutting into bars.

Makes 1 dozen.

Source: Nestle Tollhouse Best-Loved Cookies 1995, p. 83


Just make sure you share. Too many brownies could result in breakage.

Read more...
Tuesdays With Dorie - Chipster-Topped Brownies

>> Tuesday, May 26, 2009


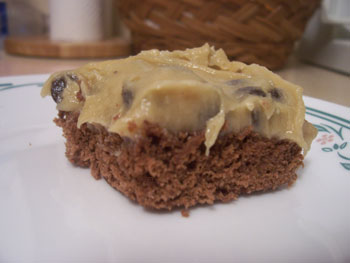
This week's pick was Chipster-Topped Brownie, brownies with a chocolate chip cookie layer on top. I have tried many chocolate chip cookie recipes and failed at pretty much all of them, and this recipe was no different. My chocolate chips sunk into the brownie layer, so really it's just a brownie with a cookie layer on top. This is what they are supposed to look like. Also, I think I overbaked them slightly, so I suggest covering with foil to keep the top from being too brown. One thing I didn't like about the recipe is you had to wash dishes after making the brownie layer. Unless someone asks me, I probably won't make these again.


Thanks to Beth from Supplicious for picking this week's recipe! You can find the recipe on pages 94-95 of Baking: From My Home To Yours or on Beth's blog.

---
Anybody else ever experience a baking rut? It seems like everything I have been making lately is messed up in some way. My wonton soup didn't cook properly, chocolate chip cookies failed like usual, my carrot cake didn't rise, the cookie layer didn't work with these brownies, and yesterday, my hamburgers fell apart. My hamburgers never fall apart. Is it possible for the baker's mood to be transfered into food? I feel like everything lately is falling apart, like those burgers.

Read more...
Tuesdays With Dorie - French Chocolate Brownies

>> Tuesday, June 03, 2008


I followed the rules for once! For Tuesdays with Dorie, I made the chosen recipe - French Chocolate Brownies. What is so French about them? Nothing special except Dorie created the recipe in Paris. I was tempted to go buy rum (I still have yet to buy anything from the liquor store since I turned 21), but my mom hates rum and wouldn't eat the brownies. I decided since she is going in for (minor) surgery today, I would make them so she would like them.

You can definitely taste the cinnamon, even though it is only 1/8 tsp. It gave the brownies a different taste. Raisins were also a nice addition, but if you hate raisins, sub another dried fruit. I didn't have any bittersweet chocolate, so I used semi-sweet. The brownies took an extra ten minutes to bake than what Dorie suggested. The top is crumbly when you try to cut them, which I didn't like too much. They were good, and I would make these again.

I didn't put the 8x8 pan on a baking sheet and I melted the chocolate in the microwave. No problems there, so do whatever is easier for you.


French Chocolate Brownies


1/2 cup all-purpose flour
1/8 teaspoon salt
1/8 teaspoon cinnamon
1/3 cup raisins
1 1/2 tablespoons water
1 1/2 tablespoons dark rum (optional)
6 ounces bittersweet chocolate, finely chopped
12 tablespoons butter, at room temperature and cut into 12 pieces
3 large eggs, at room temperature
1 cup sugar

1. Center a rack in the oven and preheat the oven to 300°F. Line an 8-inch square baking pan with foil, butter the foil, place the pan on a baking sheet, and set aside.

2. Whisk together the flour, salt and cinnamon, if you're using it.

3. Put the raisins in a small saucepan with the water, bring to a boil over medium heat and cook until the water almost evaporates. Add the rum, let it warm for about 30 seconds, turn off the heat, stand back and ignite the rum. Allow the flames to die down, and set the raisins aside until needed.

4. Put the chocolate in a heatproof bowl and set the bowl over a saucepan of simmering water. Slowly and gently melt the chocolate, stirring occasionally. Remove the bowl from the saucepan and add the butter, stirring so that it melts. It's important that the chocolate and butter not get very hot. However, if the butter is not melting, you can put the bowl back over the still-hot water for a minute. If you've got a couple of little bits of unmelted butter, leave them—it's better to have a few bits than to overheat the whole. Set the chocolate aside for the moment.

5. Working with a stand mixer with the whisk attachment, or with a hand mixer in a large bowl, beat the eggs and sugar until they are thick and pale, about 2 minutes. Lower the mixer speed and pour in the chocolate-butter, mixing only until it is incorporated—you'll have a thick, creamy batter. Add the dry ingredients and mix at low speed for about 30 seconds—the dry ingredients won't be completely incorporated and that's fine. Finish folding in the dry ingredients by hand with a rubber spatula, then fold in the raisins along with any liquid remaining in the pan.

6. Scrape the batter into the pan and bake 50 to 60 minutes, or until the top is dry and crackled and a knife inserted into the center of the cake comes out clean. Transfer the pan to a rack and allow the brownies to cool to warm or room temperature.

7. Carefully lift the brownies out of the pan, using the foil edges as handles, and transfer to a cutting board. With a long-bladed knife, cut the brownies into 16 squares, each roughly 2 inches on a side, taking care not to cut through the foil.

Source: Baking: From My Home To Yours, 2006 p.92

Read more...

A Very Busy Moose

>> Saturday, December 22, 2007

Don't worry. I haven't completely dropped off the face of the internet. I've just been busy reading books from the library (novels not textbooks! yay!), baking goodies, cooking dinner, catching up on Scrubs (now halfway through season 6), or out driving like a maniac with the holiday crowd. I'm glad I chose not to go back to work at my seasonal job in the mall until after Christmas. I go back Thursday night *sigh*

Some advice for those making homemade syrup - it is hotter than boiling water and when it gets on your skin, it stays there. I have the blister on my finger to prove it. I can't reveal why I was making it because it's one of my entries for Betty Crocker's cookie contest. I have a few more ideas to try until the deadline in February.

I also bought another cookbook - Southern Living's The Cookies and Candy Cookbook. I haven't used it yet, but since I have leftover evaporated milk, I'm looking into fudge.

Anyway, here's one of the cookies I baked the first night I came home from school from Land-O-Lakes. Enjoy!!


Snickerdoodle Pan Cookies


Bars
3/4 cup sugar
3/4 cup butter, softened
1 egg
1 tsp vanilla
1 1/2 cups flour
1/2 tsp cream of tartar
1/2 tsp cinnamon
1/4 tsp salt
1/4 tsp baking soda

Topping
1 Tbsp sugar
1 tsp cinnamon

1. Heat oven to 375F. Grease 9x9 pan. Combine topping ingredients in a small bowl. Set aside.

2. In a large bowl, beat at medium speed sugar, butter, egg, and vanilla until creamy. Reduce speed to low; add remaining bar ingredients. Beat until well mixed.

3. Spread batter evenly into pan. Sprinkle with topping mixture. Bake 11-13 minutes or until light golden brown and bars begin to pull away from sides of pan. Cool 5 minutes. Cut into squares.

Source: Land-O-Lake's 5th Annual Holiday Cookies, 1998 p. 122

Read more...

Bake-Off Challenge With Megan

>> Friday, November 30, 2007

Whenever I sent Megan an extra copy of Pillsbury's 15th National Bake-Off Cookbook, we agreed to pick a recipe and bake it. Some can call it our own mini bake-off. Megan sent me a list of several recipes she picked, and I picked which one we would do first. I chose a recipe called Apple Harvest Squares, which was entered by Rex Pippin of Alabama.

I decided to bake these while I was home for Thanksgiving break. The base is very similar to a pie crust. Normally you would use a pastry cutter. I remember reading in Dorie Greenspan's book Baking: From My Home To Yours, you can also use your hands to cut butter, so I did. The result was fine, although I would suggest pressing it into the pan with the bottom of a glass. The topping didn't make enough to cover the entire base, so next time I would increase it just a smudge. I put the adjustments into the recipe below. These taste best when served warm.

Megan, we need to do this again :)

EDIT - Oops, there has been a misunderstanding!! Megan ended up doing Sweet Applets instead. Oh well, at least they both have apple. Now we can switch recipes and see if we get the same results. Hopefully so, because her applets look good!


Apple Harvest Squares


Base
1 1/2 cups flour
1/3 cup sugar
3/4 tsp salt
1/2 cup butter
2 cups chopped apples (I used Granny Smith)
1/8 cup sugar
1/2 tsp cinnamon

Topping
1/2 cup sugar
1/2 cup evaporated milk
1 tsp vanilla
1 cup chopped walnuts
2 cups flaked coconut

1. Preheat oven to 375F. Grease the bottom of a 13x9 pan.

2. Sift together flour, 1/3 cup sugar, and salt. Cut in butter until particles are fine. Press into bottom of pan. Arrange apples on top. Combine 1/8 cup sugar and cinnamon; sprinkle on top. Bake for 20 minutes.

3. Meanwhile, combine 1/2 cup sugar, milk, vanilla, walnuts, and coconut. Spoon over baked base. Bake for another 25-30 minutes or until golden brown.

Source: Pillsbury's 15th Grand National 100 New Bake-Off Recipes, 1964 p.43


Murray getting ready for the holidays


Read more...

When Two Cravings Attack

>> Saturday, November 17, 2007

I told my friend to pick a recipe for us to bake last weekend. She wanted these chocolate chip cookie bars I made once, but then she also wanted brownies. She had the brilliant idea of putting the two together, so I googled some recipes. I chose a recipe from About.com because it involved cocoa powder (which I had) and not unsweetened bars (which I didn't have). We tried cutting the amount of butter in the recipe because it totaled 3 sticks. We had enough brownie batter but not enough cookie batter, so I would cut the butter in the brownie layer (which I adjusted in the recipe below) but keep the butter amount for the cookie layer. All my roommates and us enjoyed these brownies. Too bad the Brownie Babe Contest isn't running now because I would definitely enter these.


Double Decker Brownies


Chocolate Chip Cookie Layer:
12 tablespoons butter, cut into slices
1 cup brown sugar
1 1/2 cups all-purpose flour
1/2 teaspoon baking soda
1 large egg, at room temperature
1 teaspoon vanilla extract
1 cup semi-sweet chocolate chips

Brownie Layer:
8 tablespoons butter, cut into slices
3/4 cup unsweetened cocoa powder
1 1/2 cups sugar
2 large eggs, at room temperature
1 1/2 teaspoons vanilla extract
3/4 cups all-purpose flour

1. Preheat the oven to 325 degrees. Grease a 13x9 pan.

2. Chocolate chip layer: Melt butter over medium heat. Remove from heat and whisk in brown sugar until smooth. Set aside to cool to room temperature, but still liquid.

3. Brownie layer: Melt butter over medium heat. Remove from heat and whisk in cocoa powder. Scrape into medium-sized bowl with a spatula. Add sugar, whisking to combine until smooth. Add eggs, one at a time, mixing after each addition until blended, adding vanilla with the last egg. Using a large spoon or spatula, mix in flour just until blended. Pour into prepared pan, and gently spread evenly over the bottom of the pan. Set aside.

4. Chocolate chip layer: Combine flour and baking soda in a small bowl. Combine with cooled butter mixture until smooth. Whisk in 1 egg and vanilla until smooth. Fold in chocolate chips.

5. Space spoonfuls of cookie mixture over the brownie layer. Bake about 40 minutes or until a toothpick inserted in the center comes out with small gooey bits. Do not overbake. Cool to room temperature.

Source: About.com

Read more...

Spontaneous Brownies

>> Sunday, November 04, 2007

Every Monday, Wednesday, and Friday, my friend and I eat lunch at my apartment before going to our 1:00 class. We were talking about baking and she goes "Let's make some brownies." "Now?" "Yes, now!" I was a little flustered because I had to search for a recipe (The one I use is back home in a binder. Remind me to grab that over Thanksgiving break.) and of course my laptop decides to go so slow that I could've driven home, grabbed the recipe, and driven back and it still would've been loading (exaggeration, of course). Finally, I got a recipe and we baked one hour before class started. This means we had to leave by 12:45. Uh yea. If the brownies would've baked the 25 minutes it called for, we would've been fine. Nope, it decided to take an extra 10 minutes. Thank goodness my one roommate was here to watch it while we power-walked to class.

I usually don't have eggs on hand, so I've been reading up on egg substitutions. Yay for vegan recipes!! I used butter, so these brownies aren't 100% vegan. However, they use bananas to replace the egg. I didn't realize until after the brownies were baking that there was no baking powder in the recipe!! The reasoning was that eggs can serve as a levening agent, and since I substituted with bananas, I lost that effect. As you can see by the picture, they still came out fine. I subbed chocolate chips for the bittersweet chocolate, two bananas for the eggs, and left out the espresso powder. I didn't bother letting the chocolate cool to room temperature.

I used leftover cream cheese frosting. The brownies are good enough without frosting, so feel free to leave it off to cut on calories. Then again if you're eating brownies, you probably don't care about calories at the moment. I didn't.


Chocolate Banana Brownies


1 cup chocolate chips
1/2 cup butter
2 large eggs or 2 ripe bananas
1 cup granulated sugar
1 tablespoon unsweetened cocoa powder
1 teaspoon vanilla
1 cup flour

1. Preheat oven to 350F. Grease an 8x8 inch baking dish or line it with foil.

2. In medium saucepan, stir chocolate and butter together until just melted. Remove and set aside.

3. Mix eggs/bananas, sugar, cocoa powder, and vanilla together. Add chocolate and mix well. Fold flour into batter until just incorporated.

4. Pour batter into baking dish and bake until a tester comes out clean, about 25 to 30 minutes. Place on a wire rack and cool completely before cutting.

Source: Recipe Zaar

Read more...

The Next Browniebabe

>> Wednesday, July 18, 2007

I've been waiting for Myriam to start another round of Browniebabe of the Month. For my entry, I decided to bake Chocolate Chip Cookie Dough Brownies. Very successful but very rich. I had 2 brownies, and now I feel sick. Maybe next time I wouldn't use a stick of butter in the cookie dough. I like this recipe because there's no egg in the cookie dough so it's perfectly safe to eat. It overpowered the brownie, so although you get the texture of the brownie, you can't really taste it. Next time, I'm going to try baking the cookie dough on top for a few minutes. I think it might not be as rich than just chilling it on top in the fridge.

Now I know what you're thinking. If I had changes to make, why am I entering this into the round up? I don't expect to win. I enter challenges to try new recipes and to share recipes I find successful or recipes I tried and suggest ways to improve them. I would make these brownies again but with the changes listed above.

I got this recipe from Cookie Madness but I changed the ingredients a good bit.


Chocolate Chip Cookie Dough Brownies


Brownie
1/3 cup butter
3/4 cup sugar
2 oz. bittersweet chocolate
1/2 teaspoon baking powder
2 eggs
1 tsp vanilla
3/4 cup flour

Cookie Dough
1 stick butter
3/4 cup brown sugar, packed
6 tablespoons granulated sugar
3 tablepsoons milk
1 tablespoon vanilla
1 cup flour
1 cup semi-sweet chocolate chips

1. Preheat oven to 350 F. Line 8x8 inch pan with parchment.

2. Melt butter over medium heat. Stir in sugar and cook, stirring constantly, until sugar melts. Add cocoa and stir until smooth. Remove from heat and pour mixture into a bowl. Let cool for about 5 minutes. Stir in baking powder. Stir in the eggs, one by one, then add vanilla and flour. Pour in pan and bake for 25-30 minutes or until brownies are set. Let cool for 30 minutes.

3. Beat together butter, both sugars, milk and vanilla. Add flour and chocolate chips and stir. Spread this mixture over cooled brownies and place in refrigerator for about 30 minutes until firm.

Source: Cookie Madness


*Wink*


Read more...

Stay Connected

Email: chocolatemooseyblog[at]gmail[dot]com
Facebook: Chocolate Moosey Fan Page
Twitter: @chocolatemoosey
Pinterest: Chocolate Moosey's Boards
Foodbuzz: Chocolate Moosey's Profile

Copyright

© 2007 - 2012 Chocolate Moosey

All content belongs to Carla unless otherwise noted.

  © Blogger template Webnolia by Ourblogtemplates.com 2009

Back to TOP